Crabby Patties (crabcakes)
November 30, 2006

I realize I've been ignoring you all of late, but there have been many preoccupations in my life of late. But, now that I am at liberty to do so, I give you the crabby patty post (ever see Spongebob?)
There is nothing more awful and unsatisfactory than ordering a crabcake and getting a lump of fried bread crumbs with a little bit of imitation crab thrown into the mix. I promise, these crabcakes will be meaty, tasty, and have your guests salivating for more.
To being, lets talk ingredients. I used a large can of pulled lump crab meat from my grocer's seafood counter. These cans are large and usually refridgerated because they are perishable otherwise. I went to Safeway and found the exact same can of crab meat for $10.99 that was selling for $14.99 at Whole Foods (my favorite but often overpriced market). So that is that on crab meat.
Now, the aioli should be made fresh. I've posted a recipe already for it before, and I suggest you make this aioli, but add minced chipotle peppers after the mixing job is over for extra zest. The fresh aioli is far superior than mayo and chipotle peppers mixed together.
You will need:
- 1 large can of pulled lump crab meat
- 1/2 lb of small bay scallops
- 4 shrimp, deveined and without the shell
- 1 egg
- 3/4 c bread crumbs for mixture + 1 c for dipping
- 1 lemon
- 1/4 c minced Italian Parsley
- 1/2 c diced red and yellow (or green) bell peppers
- 1/2 c minced onions (white)
- 1 minced jalapeno pepper
- 4 cloves of minced garlic
- salt and pepper to taste
- olive oil for frying, and a hot skillet (preferably a castiron pan)
Step One: In a blender or food processor, add juiced lemon, bay scallops, and shrimp. The mixture is the paste or binder for the crab meat. Remove and put in a large mixing bowl.
Step Two: Add crab, vegetables, salt, peppers, parsley, egg, and breadcrumbs. Mix with a wooden spoon until well combined with the scallop/shrimp paste. The consistency should be that of a wet cookie dough.
Step Three: Allow 1/2 inch of olive oil to slowly heat in a heavy bottomed frying pan on medium or medium-low heat (depending on your stovetop), don't let this smoke! Form 1/2 c servings of the crab mixture in your hand to make a patty and "dip" each side into the extra breadcrumbs to form a good thin crust. You can make them bigger, but you need to be aware that if they are bigger, it takes longer to cook and may end up being burnt if they sit too long over the heat.
Place the patties in the frying pan and press each down slightly with a spatula. Cook each side with a lid on the pan if it spattering, for 5-8 minutes. The patties should be golden brown. Carefully flip each patty and complete cooking.
Remove from heat and drain on paper towels. Serve with a side salad and some delicious chipotle aioli. I like eating this in the winter when the shellfish is the freshest. Mmmm.
Garlic & Cumino Pesto Quails in Chicos
November 21, 2006

What better bird to serve with chicos than the
Garlic and Cumin Pesto Quails. Quails are a small Mexican game bird with a more "chickeny" flavor than regular chicken. The thing to remember about cooking this delicacy is that you should not overcook it or leave it in the oven too long because it will dry out and become tough. I learned this the hard way when I cooked this dish for several people and had to wait 45 minutes to serve the birds. At $15 for four birds, you don't want to start over again. If you are having trouble finding them, go to Whole Foods.
If you are not too keen on trying something new, just use chicken breasts or Cornish hens instead, but be sure to increase the cooking time to 30 minutes, and reduce the heat to 375 degrees.
You will need:
- 5 cloves of garlic, crushed
- 2 tbsp cumin
- 1 tbsp minced cilantro or 1 tsp coriander
- 1 tbsp honey
- 1/4 c toasted pine nuts
- 1/4 c olive oil
- salt to taste (about 1 tsp)
- lime
- 4 quails (may substitute chicken pieces here)
Step One: Preheat oven to 400 degrees. Place the garlic, pine nuts, and olive oil in a mortar and pestle, crushing until the mixture is thoroughly incorporated. You may do this also in a blender, but be sure to slowly drizzle the olive oil in. Add more if your mixture is too thick a paste. It should be slightly runny.
Step Two: Add remaining ingredients, mixing them together.
Step Three: The quails should already have their back bones removed. Wash them and pat dry. Sear each quail on each side in a hot pan over medium-high heat with 2 tbsp of butter or olive oil for 1-2 minutes in order to brown the skin and seal the juices.
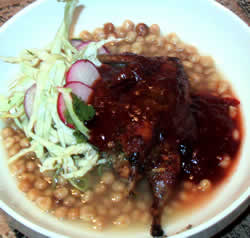
Step Four: Place the seared quails onto a roasting pan or cookie sheet, basting them in the garlic-cumin pesto mixture, and roast on each side for 6-8 minutes, or until brown (do not let them dry out). Remove and eat with a hot bowl of chicos, and red chile on top. You can finish dressing the plates with a side of finely chopped cabbage, radish, red onion, and lime juice.
Chico Soup with Red Chile
November 15, 2006
Having worked so hard this fall to prepare the chicos, I was pleased to make chico soup with a twist. While most chico soup recipes call for roasted beef ribs, pork, or chicken, I decided to use a traditional Mexican game bird instead: the humble quail.
This recipe has three main parts: chicos, quail, and red chile. I suggest you make the red chile in advance and freeze the leftovers for other dishes like enchiladas or huevos rancheros. The quail can be made using my unique Garlic and Cumin pesto recipe. I have posted this recipe separately so as to give you a better perspective about the ingredients that can go into chicos, but also to edify the glorious little kernels that can be eaten all by themselves.
There are few things as simple and tasty as a pot of fresh cooked chicos. All that is required is water, chicos, pressure and time (sort of like the creation of igneous rocks, minus the chicos). First, you will need the following:
- 1 c of chicos
- 5 c of water
- salt to taste
- pressure cooker or crock pot
Step One: To clean the chicos, take the chicos out of the bag and spread them on a table. Pick out the burnt chicos. Place chicos in a small bowl,and slowly pour them into another bowl while blowing on them. This process removes any excess chaff on the kernels that remains. Rinse chicos in a colander or sieve.
Step Two: Place chicos and water in a crock pot or pressure cooker. Understanding the size of your cooker may vary, you can add 4 c of water instead of 5 c (I just like a lot of chico juice). If cooking in a crock pot, cook on low overnight and immediately turn off in the morning (about 8 hours later). If cooking in a pressure cooker, cooking time will be 50 minutes after the pot starts to "chiar" or hiss. remove from the heat and cool. Serve in bowls with salt to taste, or add red chile for good measure.
Chicos are traditionally served in a fresh pot of beans or with a meat of some kind. You can use beef, chicken, or whatever game bird or other meat you like. My next post contains a recipe for garlic-cumin pesto quails over chicos in red chile. My only caution is that the quails must be cooked right before serving on order to keep them tender and juicy, otherwise they dry out in the oven and turn that horrid grey color that many game birds turn when overcooked. EEK! For now, enjoy the simplicity of cooked chicos with salt and perhaps a bit of chile.
Labels: chili, corn, green chile, New Mexico, red chile, soup, traditional
Making Chicos Part Dos
November 07, 2006
 As promised, here is Part Dos of the Chicos post. The photo illustrations take the chico making process described in last week's post through to the end. We left off last when Faustina placed the last of her corn in the horno for roasting and mudded up the doors. The picture here is of her and her comadre washing their hands of the mud used to seal the doors closed for the night. The horno door, if you notice, is being chipped away here the next morning. The door had mud bricks on the inside of the oven, and a layer of adobe on the outside.
After breaking down the doors which were extremely hot from the overnight fire, Faustina reach into the oven with a pitchfork and her bare hands to remove the husks from the dying the embers. She placed the corn in a wheelbarrow and moved them to the back of a pick-up truck where myself, Faustina's comadre, and her brother stood with small paring knives.

At the truck bed, each of us took the corn husks, pulled them back, stripping the excess layers of silk and husk. We cut off the bottom stem of the corn to shorten it for drying. Faustina gathered each ear of corn we cleaned and she braided the thinned husks together to form a ristra. A ristra is made with corn or chiles by stringing the chiles or corn to dry outside in the sun. Faustina quickly braided about 12 ears of corn together to be strung up on her drying rack pictured here.
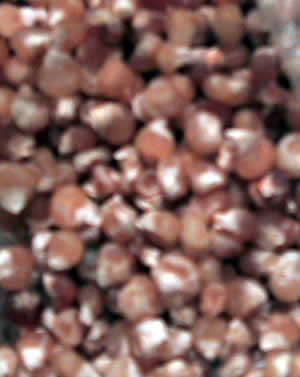
 Chicos need to be dried in the sunshine for several days until the kernels turn hard and wither into a dark brown. The chicos are then taken off the drying rack and rubbed together to remove the dried kernels. At this point, they can be stored in plastic bags or containers for storage year-round until they are cooked.
Faustina sent me the product of our labor not to long ago and I made quite a delicious chico soup. I promise to post that recipe for your enjoyment as well. Again, I'd like to acknowledge Faustina's kindness and generosity for taking the time to expose me to such an ancient art of food preparation.
Labels: corn, New Mexico, traditional
Making Chicos (that's roasted dry corn, not little boys!)
November 02, 2006

It is Dia de los Muertos (Day of the Dead) and it is time to feed your dead relatives and visit them at the cemetery. Traditionally, people leave candies and food by a loved one's graveside to celebrate and remember them. On this day, I am going to remember my dead with a post about chicos, and follow-up with a chico recipe.
Do you know what a chicos are? Well, if not, you'd have to ask someone in Southern Colorado or Northern New Mexico because not many others could tell you off the top of their head. As half of each, I can tell you with confidence that I know what chicos are: a roasted and dried ear of corn, the kernels removed and stored until cooking time. To tell you the story of how to prepare chicos however, I will employ many pictures from a recent visit I made with an elder relative who lives in my parent's "town" (if you can call it a town). Her name is Faustina and she is as old as her house (about 78), and she let me join her, her brother, and sister-in-law in the making of the chicos. What I share here are merely the impressions of that two day visit and by no means can capture the immense knowledge Faustina has of traditional food preparation techniques. All that I share is what Faustina was generous enough to teach me and I hope that these photographs will help preserve the traditions she has maintained for all of her life.
This post will be split into two to accommodate the explanations of the processes of preparation and actual recipes for cooking chicos. Additionally, I hope a two-part series will make reading the post easier.
To begin, I should give you some background about chicos and their origin. When I first moved to New Mexico, I was surprised to find chicos at the local Smiths grocery store in bulk. As a child, I remember having to track someone down on the side of the road selling them, or go to neighbors who toiled away to make any that year and buy them. The cost is usually around seven to ten dollars per pound because of the intense preparation required to make them. It was in New Mexico that I also learned that several Native American Pueblos had a delicious chico soup of some kind or another very similar to the type I grew up with as a Mexican-American. This is no coincidence however, because Pueblo peoples also introduced desert farm techniques to even make corn patches a possibility in the harsh climates of Northern New Mexico and Southern Colorado.
According to a student paper published on-line at New Mexico State University in Las Cruces: "Chicos are corn in the soft dough stage that has been steamed in the husk and dried. Traditionally, a pit was dug in the ground and the soil heated by burning wood in it for 1 to 2 days. The fire is removed and green ears in the husks are then placed in the pit and covered with soil. The partially roasted ears are removed, the husks stripped back, and the ears tied together in pairs and hung out to dry. The kernels were roasted to kill the grains, and to help them dry faster to preserve their food value. Chicos are generally cooked with chile and green onions, or in stews."
Apparently, chicos are also highly thought of in the slow food community who had this to say about chicos: "Chicos . . . . are small and wrinkled in appearance, and if the corn was roasted before drying, it can be very dark as well. When they are cooked . . . they swell up to their former size and taste like freshly smoked corn. . . . Chicos are made in two different ways. In the first method field corn is picked, shucked, then tied into ristras (strings) and hung to dry or alternatively, dried on screens. Once dehydrated, it is rubbed off the cob, and cooked until the kernels become clear, giving the corn a sweet, fresh taste. In the second method, white or yellow field corn is picked but not shucked, then put into a horno (adobe oven) to roast overnight. It is then tied into ristras and hung in the air to dry. Once the kernels are completely dried out, they are rubbed off the cobs and stored until ready to use. The kernels are dark from being roasted, and the roasting enhances their taste, adding a smoky flavor. Chicos are traditionally made by the American Indian nations of the southwest US as well as by the Hispanic culture that settled in the region hundreds of years ago."
Fau
 stina follows the method of cooking chicos that requires an initial roasting, then shucking and drying of the corn. In Mexico, it is much more common to simply dry the corn in piles rather than roasting before drying. To facilitate the roasting process, Faustina does not use a pit, but rather a traditional adobe horno (outdoor oven) that she and her brother constructed that she uses to bake breads and roast her corn (pictured on the left). Hornos have a solid adobe or poured concrete base, and a dome of adobe bricks that are covered with a layer of mud. The oven also has a small hole in the top for smoke, and a door in the front that can be blocked with more bricks for cooking, or simply a sheet of metal. To see the steps of construction, check out this link on New Mexico Culture Net.

After Faustina's sweet corn was ready to be picked, she lit a fire in the hornos and stoked them all night long until the morning. When the embers were still red, she placed her ears of corn inside, poured in a bucket of water, and sealed the horno door up with adobe bricks and mud. The mud was mixed on-site by her brother (pictured far left). The mud was used to fill in any cracks in the adobe ovens so that no heat escaped (pictured in center-left). The ears were left overnight in the oven to smoke and roast.

The process of preparing the ovens and placing the corn inside to roast was not simple. Faustina, in addition to roasting and drying her own corn, also grows her own corn. She hand picked the corn along with her brother and sister-in-law, and then prepared the ovens. She uses a sweet white corn she's grown for many years. When buying from the store, it is common for people to use a sugar queen variety of corn to make chicos.
For the next "Making Chicos" installment, I will present the story of removing the corn from the ovens, braiding, and drying it. I will also be posting a recipe later on that I am sure will inspire many of you to hunt down a roadside stand in New Mexico that sells chicos. If you can't make it there however, try the Albuquerque Tortilla Company on-line store.
Labels: corn, New Mexico, traditional
