Chicken in Tomato Chipotle Sauce
April 02, 2008

It has been two months since I’ve blogged – terrible neglect, I know. In light of this, I am going to give you a random recipe I’ve cooked a few times over the last two months that actually involves chicken – the bird I rarely eat. I loved this dish so much I made it again and again. If you dislike chicken because of its plain nature, I suggest you try cooking it with this fabulous chipotle sauce. I also know that you can substitute carrots and potatoes for the chicken to serve a vegetarian version of this dish. The entire meal is below, with cooking instructions and alternative “quickies” for folks with less time on their hands to prepare the full meal.
Chicken in Chipotle Sauce with Beans, Papas, and Corn Tortillas
For the sauce:
1 tomato
4 pieces of garlic, with the skin on
1 tbsp Mexican Oregano
4 chipotle chiles (you can buy this in a can)
¼ white or yellow onion, quickly sautéed in hot vegetable oil
1 c water
Step One: Place tomato and garlic pieces on a cookie sheet and broil. You want the tomato skin to blister (it will look slightly burnt), and the garlic skin to turn brown. Oven times vary.
Step Two: Remove the skin of the tomato and garlic. Place tomato, garlic, oregano, chipotle peppers, sautéed onion, and water in a blender and puree. Set aside.
You can freeze this mixture to serve it later when you are crunched for time.
For the Chicken:
2 chicken breasts, not frozen! (you can leave the bone in or out)
3 tbsp vegetable oil
Salt and pepper to taste
Heat the oil over medium heat until hot. Add chicken, salt and pepper, and cook until chicken browns slightly (about 7-10 minutes). Add the sauce, cover pan and let simmer for 20 minutes. The simmering sauce finishes the cooking process and will result in a tender chicken.
The side dishes:
Pinto Beans
Step One: clean 1 cup of pinto beans (i.e., pick out the rocks and rinse the beans under water). Soak the beans overnight or while you are away at work all day in a large bowl. The water should cover the beans by 2 inches.
Step Two: Drain the beans and add them to a large pot. Add 4 cups of water and cook on high for 1 ½ - 2 hours or until beans are tender. Keep adding liquid if too much evaporates. The liquid should be light brown.
Step Three: When beans are tender, add 1 tbsp salt, and 3 tbsp of olive or vegetable oil and slightly mash the beans. Cook for another 15 minutes before eating. I like to serve the beans more like a soup, but you can always drain the liquid and mash the beans in a frying pan with the 3 tbsp of olive or vegetable oil for frijoles refritos. You should be advised that adding salt before the beans finish cooking prolongs cooking time.
Roasted Papas (potatoes)
Rinse 3 medium potatoes of any variety, and cut into smaller pieces. Toss in 4 tbsp of olive oil, salt and pepper, and roast in the oven on a cookie sheet at 400F for 25 minutes or until toasty brown. Serve hot!
Corn Tortillas
Contrary to popular belief, your tortillas should not be placed in the microwave. Rather, treat your tortilla with some dignity and place it on a comal or heat it in a sauté pan over medium heat, carefully turning the tortilla until each side is warmed and begins to slightly toast. Place in a clean towel to keep warm.
If you are cooking beans, you can make them from scratch, or heat up some canned beans on the stove with some vegetable fat (so you don’t get too much gas!). If making them from scratch, follow the recipe above.
Lastly, if you want an all vegetarian version of this dish, swap carrots for chicken, but do not add the potatoes yet. They will turn mushy. Roast the potatoes as indicated above, and ladle the sauce and carrots over them.
¡Buen provecho!
Labels: chicken, chili, pinto beans, tomatoes
Green Chile Bounty
September 06, 2007

The labor day holiday, while an excellent homage to the common man, is also the peak of the green chile roasting season. For those obsessed with the recent seasonal food craze, there is no other season more perfect than late August and early September - during this delicate 4-6 week period, the green chile harvest begins and quickly ends in the smoke of open pit grill fires or cylindrical roasters throughout the southwest.
Green chile is consumed by the bushel in my family, and I couldn’t wait to get mine this year with my mom. For my boyfriend, this was the first time he’d ever had to prepare green chile for freezing, and some explanation was required, which I give you here.
First, what are green chiles? Why they are the most deliciously edible member of the nightshade family of course! Oddly, many of the new world’s foods that are a part of the staple diet in Mexican homes is from the nightshade family: potatoes, chiles, and the famous tomato (of which Europeans were very suspicious knowing that the nightshade is also lethal in some strains). What makes chile so special is the capsicum - a chemical that encapsulates the seeds and forms pockets on the inside of the chile giving the fruit its intense or not-so-intense heat. Chiles come in many shapes, sizes, colors, and levels of sweet (i.e. a bell pepper), to practically lethal (i.e. habanero). The chile consumed by so many Mexicans of the southwest (and I iterate here "of the southwest"), is largely the variety known as Anaheim (which includes sub-varieties like Big Jim, and Pueblo Short).
Diversion: Now, my brother-in-law is from Mexico, but he sure doesn’t eat GREEN chile - that is because for some strange anthropological reason I don’t know, the Mexicanos and Indios of the southwest liked to work twice as hard as their southern counterparts and harvest chiles twice a year as opposed to once a year. Yes, you heard it here first, the red chile you eat in chile con carne, or some other noxious combination peddled in some awful Tex-Mex aisle of the grocery store is really just ripened green chile that has been dried and usually ground up. As you know from my other posts on how to make red chile for enchiladas, I usually re-hydrate whole dried red chiles from a ristra to make red chile. However, in New Mexico and southern Colorado, the folks really like their ground chile molido - the powder variety. I can never give you my recipe for red chile made from the powder though or else my mother would kill me. Sorry.
Okay, enough about red chile, back to green. So basically, the theory is that very dry and tough arid climates are good homes for growing chile. It is a hardy plant that will yield fruit in the most sun beaten conditions - ergo, New Mexico. All that "Hatch" chile talk is really just chile grown in the region of Hatch, New Mexico. It is famous for chile because it had good marketing tactics - but also because the dry and intense heat of that town contributes to the Hatch grown chile’s thick skin and good range of milds to scorching hot. Now, the New Mexico harvest occurs about 1 to 2 weeks prior to the southern Colorado harvest. This is why you can buy into mid-September if you are in Colorado.
Every year, my family ventures south for a big chile roasting shindig. We eat chile throughout the year that has been properly bagged in ziplocks and frozen until eaten. Sometimes, if my Mom and I feel really adventurous, we can our chiles in little glass jars with garlic, tomatoes and onions. It is a lot of work and requires some crazy canning skills like you’ve never seen before - it’s like Texas Ranch House got together with Fifties House on PBS and put Mexicans in it instead of Gabachos.
So here you are - in line with a bunch of other hungry folks, Gabachos and Mexicans alike, waiting for your turn in the roasting line. My mom told me that when she was a girl, there was a big shift in the green chile vendor market - someone got the bright idea of using a metal cylindrical cage to roast the chile in over a natural gas burner. This method permits you to roast a whole bushel at once, in about 20-30 minutes. This practice has remained the standard ever since. So, you order your bushels and varieties (usually labeled simply as Mild, Medium, Hot, Extra Hot, and Ejola!), have it roasted; it gets placed into a large plastic garbage bag and placed in a cardboard box, and you take it home. You carefully open the bag after about 30 minutes (to let the steam settle and not burn your face off), and then you start bagging the chiles in quart size ziplock baggies for freezing all winter long. You also eat about 30 tortillas filled with the peeled chiles, along with some ajo picado and onion, with salt, and try not to rub your eyes. MMMMMMM.
Now I realize you’ve read this far hoping that I will give you a recipe. So I will - a simple one that I will call plainly and perhaps misguidedly a "relish."
You will need:
- 8 to 10 roasted and peeled green chiles
- 4 cloves of crushed and minced garlic
- ½ minced white onion
- kosher salt
- flour tortillas
Step One: Chop up those chiles as fine as you can. I recommend that if the chiles are frozen, thoroughly thaw them first, then peel, de-seed, chop the stem off, and then proceed to chop away in front of the tele.
Step Two: Throw your garlic into the mix and continue chopping. Add the onions, chop chop.
Salt to taste. Eat this on a tortilla and its like you were at the chile harvest all over again. Perfect for eating on top of anything - chips, hotdogs, birthday cake, etc.), and guaranteed to make you cry.
Labels: chili, green chile, harvest, New Mexico, roast, traditional
Chico Soup with Red Chile
November 15, 2006
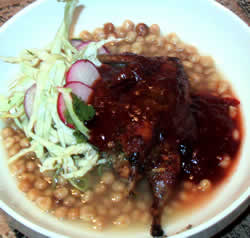
Having worked so hard this fall to prepare the chicos, I was pleased to make chico soup with a twist. While most chico soup recipes call for roasted beef ribs, pork, or chicken, I decided to use a traditional Mexican game bird instead: the humble quail.
This recipe has three main parts: chicos, quail, and red chile. I suggest you make the red chile in advance and freeze the leftovers for other dishes like enchiladas or huevos rancheros. The quail can be made using my unique Garlic and Cumin pesto recipe. I have posted this recipe separately so as to give you a better perspective about the ingredients that can go into chicos, but also to edify the glorious little kernels that can be eaten all by themselves.
There are few things as simple and tasty as a pot of fresh cooked chicos. All that is required is water, chicos, pressure and time (sort of like the creation of igneous rocks, minus the chicos). First, you will need the following:
- 1 c of chicos
- 5 c of water
- salt to taste
- pressure cooker or crock pot
Step One: To clean the chicos, take the chicos out of the bag and spread them on a table. Pick out the burnt chicos. Place chicos in a small bowl,and slowly pour them into another bowl while blowing on them. This process removes any excess chaff on the kernels that remains. Rinse chicos in a colander or sieve.
Step Two: Place chicos and water in a crock pot or pressure cooker. Understanding the size of your cooker may vary, you can add 4 c of water instead of 5 c (I just like a lot of chico juice). If cooking in a crock pot, cook on low overnight and immediately turn off in the morning (about 8 hours later). If cooking in a pressure cooker, cooking time will be 50 minutes after the pot starts to "chiar" or hiss. remove from the heat and cool. Serve in bowls with salt to taste, or add red chile for good measure.
Chicos are traditionally served in a fresh pot of beans or with a meat of some kind. You can use beef, chicken, or whatever game bird or other meat you like. My next post contains a recipe for garlic-cumin pesto quails over chicos in red chile. My only caution is that the quails must be cooked right before serving on order to keep them tender and juicy, otherwise they dry out in the oven and turn that horrid grey color that many game birds turn when overcooked. EEK! For now, enjoy the simplicity of cooked chicos with salt and perhaps a bit of chile.
Labels: chili, corn, green chile, New Mexico, red chile, soup, traditional
